Setting User Preferences
These user Preferences are automatically saved to the current user for all subsequent logins until there are new settings made.
Click ‘PREFS’ on the top left side of the TMS screen.
Check or uncheck each function as preferred.
Please see below to review each selection’s functionality:
"TMS with confirmation"
Check this box if you would like to have prompt for each action done in TMS
Check this box enable an additional confirmation step for bookings done in Callcenter
"Cancellation with confirmation"
Check this box if you would like to have prompt for each cancellation made
"No table auto-attribution" 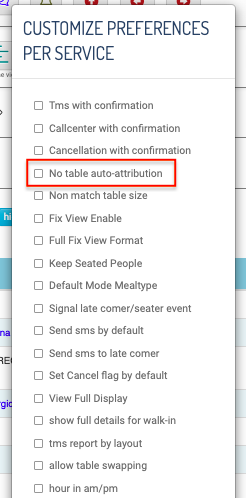
Check this box if you would like the system to stop automatic table assignment
for each incoming reservation from the reservation centre (callcenter button)
Check this box to assign tables using the layout without strict adherence to the
booking size
E.g. To allow a booking for more than 3 pax be assigned to table 32 (table of 3 pax)
"Fix view enable"
"Full fix view format"
by default it will only display the booking information by toggling the table.
"Keep seated people"
All seated reservations will be hidden from the layout based on the Dining Duration
period. E.g. A booking for 5pm with a default Duration of 60 mins and has the state seated
will be hidden from the layout at 6pm).
When this box is checked, users will need to manually set the state to ‘Left’ to clear the
table from the layout to make the table available again.
When this box is checked, the default Mode selection will be mealtype, otherwise
it would be hours.
Check this box to have flashing dot at a table signalling attention required.
The table will have a flash dot when:
- Late comer who have not arrived on time
- Seated bookings who have not ‘left’ on time
(been sitting more than the meal duration time)
Check this box to send SMS confirmation to guests automatically when a
Reservation is captured through the Reservation Center (Callcenter Button)
"Send SMS to late comer"
Check this box to send cancelation emails to guests' when the booking is cancelled.
By default, checkbox is ticked. Guest will not receive cancelation email when booking is cancelled.
By checking the preference box, it will send an email cancelation to the guest
Check this box to set default view between current seating or with the full view displaying the information of the selected table.
Below is standard view:
Below is "View full display":
Check this box to expand the walk-in form to include guests’ personal details.
These details will create a new profile or linked to an existing profile
Walk-in standard form: Walk-in full details form:
Check this box to allow user to swap two bookings between two tables within the layout
"Hour in am/pm"
Check this box to switch from 24h format to am/pm view on the listing
"Double check my attribution"
When this box is checked, the system double checks if there is any potential conflict
when a table is manually attributed. It will remind user in a pop-up message for
any conflicted attribution, and ask you how you want to proceed (keep it the way
you did it, or change it)
"Double click table call center" 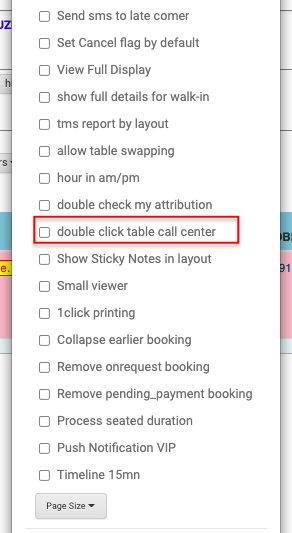
By default when you double check on any empty table it will directly assign a Walk-In
party to that table.
By checking this box it will launch Reservation Center Form when you double click on an empty table
Check this box to show the sticky note on the layout
Check this box to have a smaller viewer
Standard viewer: Smaller viewer:
This is only applicable for restaurants with Chit Printing solution.
Check this box to print guest info by clicking "Print guest" button with one click.
"Collapse earlier booking"
NEED TO UPDATE
NEED TO UPDATE
NEED TO UPDATE
NEED TO UPDATE
NEED TO UPDATE
Related Articles
Guest Profiles - View and Update
Choose any booking from the Booking Display, then click on ‘Show Guest’ button. If the guest associated with this booking has an established Guest Profile,the Profile window will appear with all information related to that guest, including booking ...Layout View - Hour View
Hour View is the default setting of the TMS’ layout Layout View reflects the state of the floor at the time/ service period of the booking being highlighted in Pink in the Booking Display. As user selects another booking at another time, the layout ...Navigating the TMS
Navigating the TMS Date: Selects the date to see bookings of that specific date. (updated) Sticky Note: Creates Sticky Notes which Users can use to leave important notes for each other Chat Feature: Users who log in to the same TMS from separate ...My account has been blocked, what do I do?
After 5 unsuccessful login attempts you account will automatically be blocked. To unblock you have 2 options: Contact your weeloy account manager Reset your password: Click Login > Click Forgot Password > Enter your email > Click RETRIEVE Check ...Taking a Reservation - Walk In
Using the Walk-in Button Click the Walk-in button Fill in the details then click ‘OK’ Using the Layout View Double click on any empty table to directly assign a Walk-In party to that table Checking the Preference ‘show full details for walk-in’ will ...